When we made our command center I had a very specific vision in mind, and in this vision were some very long skinny pockets. I knew I would not be able to find the exact pockets I wanted anywhere, so...we made them.
We began with our sketch. My pockets are 39 inches tall x 5.5 inches wide.

After I had sketched up what I wanted, I then transferred the design onto 1/2 inch mdf.

On the second pockets I sketched out where the fronts and bottoms of the pockets would go. This helps with measuring the angles and dimensions of those smaller pieces.

Now you can start cutting. I used a band saw to cut our angles so we didn't have any over cut, like you would with a table saw. You could also use a jig saw for this, we just found the band saw much easier.


I cut the back piece at this point so I could get the exact measurements for the width of my pocket fronts.

Now that your side pieces are ready, you'll want to move on to the smaller cuts.
If you drew them onto your pocket sides then you can measure those to get the rest of the dimensions you need, which is much easier than trying to take the measurements from your smaller sketch.
After you cut your first pocket front, you can replicate the angle on the other pieces by using your first cut. If your pocket fronts are exactly the same size then you can align them like the picture and they will be the same cut.

Now we encounter the dreaded bad blogger moment. I failed to take pictures of a side profile of the smaller cuts and how they will look with the back. So I've provided a sort of sketch up of the side profile for you.

To attach the base to the front, lay the two pieces on another flat surface, as in the lower half of the sketch, and clamp them on the sides, as in the picture below, minus the side of the pocket (you'll see this picture again a little later in it's proper place).

Shoot two nails through the bottom of the base into the front (as shown in the sketch above). Be sure to glue this connection.
(Tip: When you are nailing pieces together be very EXTREMELY careful not to shoot the nail out of the side. I can't tell you how many times I did this. Don't rush!)
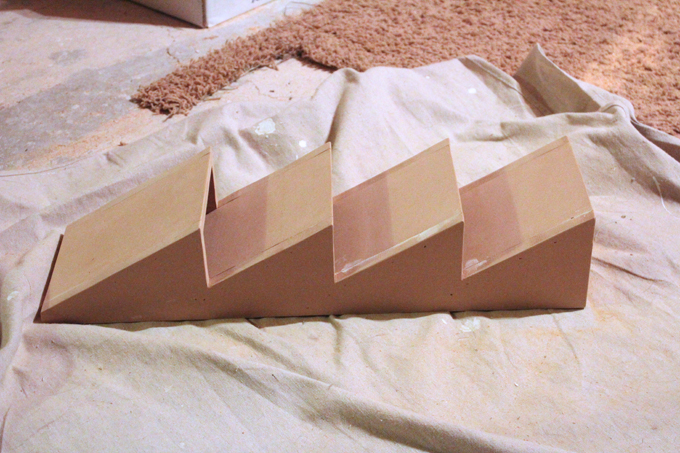
This is how your pieces will end up.

Now, clamp the first side piece to the assembled fronts/backs. Glue this connection as well.
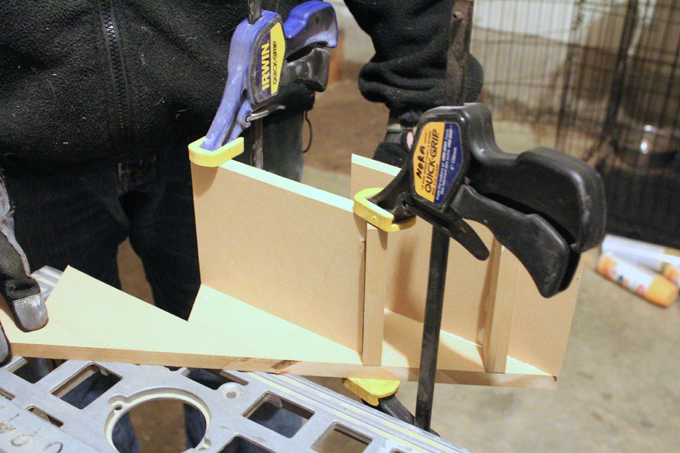
Once the first side it attached, clamp the second side. Be sure to the check the alignment just before nailing so it all comes together straight.


I used three nails per pocket. At this point the back is not actually attached yet, I just used mine to see how it fit.

Here is what it looke like from behind.

Once your pockets are all assembled it's time to fill the nail holes and cracks, then sand and paint.
Please pardon another bad blogger moment. I didn't take ANY pictures of the painting process. I was so ready to be done at this point that I kept forgetting.
A word to the wise...mdf is HIGHLY absorbent, so when you paint, be sure to use primer first and a few coats of it.
I used spray primer, and spray paint with primer included, to get a good coverage.
Paint the back piece and the pockets separately. That way, it makes it easier to get paint on the inside. Once you are done painting both parts, you can attach the back to the pockets with nails, going through the back, down the sides of the pockets. Again, be extremely careful. I shot a nail out the side and had to go back and fix it ( a huge pain!).
Once you have it all assembled, embellish as you please!
Our pockets were made specifically to fit in with the rest of our command center.
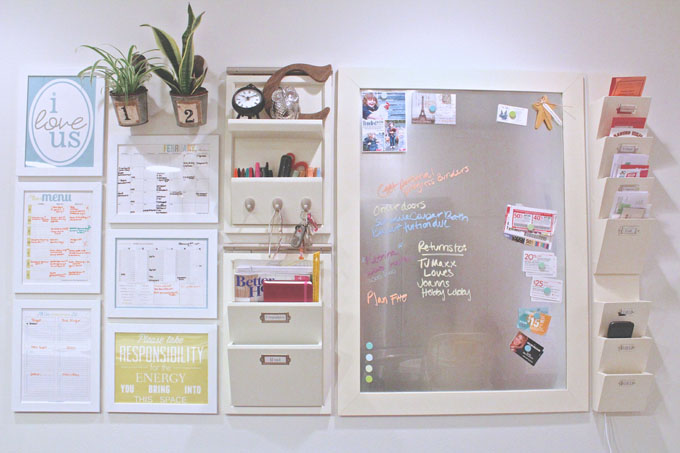
The top portion is for all of our mail and other paper items. I used scrapbook label holders to categorize everything.

The lower pockets are for our cell phones. We made small notches in the base of the pockets before attaching them to the back, so that our charger cords could hang out of the bottom.

You can see the cords hanging out of the bottom of the pockets down to a socket below. This socket has two usb ports in it, so we can plug our phones in directly while leaving the plugs open.

Hopefully this tutorial was relatively easy to understand. We did everything from scratch, and trial and error, so that process is always more time consuming and a little frustrating. If this alleviates stress for anyone wanting to make these, I'm more than happy!
Linked with:
Tags
- Facebook Like
- Google Plus One

- Log in to post comments


Comments
totally love it! come to my house and make me one!!! ;) great job!
Great tutorial! I love your message center!
How perfect! They look beautiful! Would love that in my kitchen! Way to go! :D
That Is Awesome! I so need one of those! And a really good tutorial as well!
super tutorial! Your letter pocket turned out great!
gail
merci pour ce tutoriel très bien détaillé
je compte bien le réaliser
Very lovely. Has anybody found where I could buy something similar? It's perfect, but a bit too ambitious for me!! Thanks!
I would love a command center like this one and the letter pocket is perfect! I wish I had the skills and tools to make one but "handy" only goes so far in my gene-pool :)
This is just what I've been looking for! I handle all my disabled brother's mail, bills and records/files. His mail can sometimes be overwhelming! I will use this command center and twick it just a bit. Thank you. I've been struggling on how to do this for two years. And I'll remember to keep it happy too. I love the clock,letter C and the plants. I'm sure I will love working here (with a desk and filing cabinet) and not dread it! You made me very happy today.
Thank you thank you! I've been looking for just the right size and shape of letter pockets and they are just so hard to find, and expensive for something that is not quite perfect. I am so thankful you included this tutorial. I Love love love your command center!
Ok... this may be a dumb question but wondering if you have actual measurements to make this? I have spent so much time looking for the perfect thing and you did an INCREDIBLE job on this! Thank you so much for your great ideas!!
NEVER MIND! I figured it out on the graph! THANK YOU!!