After three years in this house we finally decided to do something with our guest bathroom.
"But, what about your awesome master bathroom that you have been remodeing?" you say. Well, it's basically in the exact same spot that we left it in this post. Unfortunately the master bathroom is going to be on hold for about two years. Yes, that's right...we will be down a bathroom for two years. The master bath is going to cost a bit of money to finish it the way we want, so it's on hold until we decide to alocate funds in that direction. For now, we are focusing on bills, bills, bills. You know...telephone bills, automo-bills, actually more like "we remodeled our whole main floor" bills.
SO...that being said, we wanted to spruce up the remaining bathroom that we have on the main floor.
Initially we were going to rip everything out and do a top to bottom remodel. But then came the focusing on bills decision (as discussed above) and we threw that idea out, but I didn't want it to leave it as is. Would you?

What a beauty...I particularly love the avocado tub, and you can't see it, but there is an avocado toilet around the corner too, with a mismatched seat of course. And it never mattered if you peed on the floor (not that we do or anything *cough *husband *cough) because it was already pee yellow! Of course, wallpaper is coming back in style but I think the stuff that was in there was kind of missing the mark.
So we decided that a facelift was in order for our guest bath. On the cheap was the name of the game.
We started out with pulling down all of the wallpaper, which means we are officially wallpaper FREE in our house now (well, free of the old wallpaper anyway).
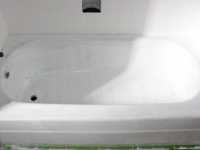
From there we moved onto the tub. Since we were going cheap for this remodel we decided to refinish our tub and tile instead of replacing it.
Here is our lovely bath before hand (and you can't really tell but all of the tiles have green speckles on them).

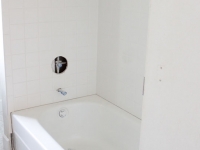
And after refinishing.

Let's just say it was a HUGE and welcome improvement. However, the whole experience was a lesson learned moment (a whole post soon to follow on the woes and wonders of refinishing your own tub). While we were at it we also sprayed the tiles around the vanity so they would match.
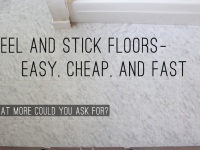
Once the tub was finished we went to work on the floor. Again a perfect cheap alternative to laying down real tile is to use vinyl tile. Specifically, groutable peel and stick vinyl tile. It's amazing how quick and easy these are to work with.
With the tile down and grouted, and new trim installed, it is a whole new bathroom already.

And just for good visual let's give you a side by side.

We are about midway through the project but still have quite a bit to do.
Here is a list breakdown of the bathroom facelift.
1. Strip wallpaper
2. Refinish tub and tile
3. Lay new floors
4. Install new trim (done by our go to contractor)
5. Paint light fixture
6. Install new shower fixtures
7. Caulk, caulk, and more caulk
8. Repair/paint walls/ceiling/trim
9. Install new toilet
10. Paint baseboard heater and ceiling fan
11. Trim and paint vanity
12. Faux paint countertop
13. Build storage on top of vanity
14. Trim mirror
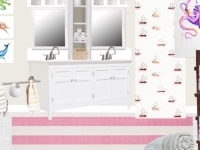
15. Decorate
More to come...
Tags
- Facebook Like
- Google Plus One

- Log in to post comments