Our command center has so far been one of the most useful places in our home, however, we were having a problem.
This year our daughter started preschool and began bringing home papers to put on the magnetic board. Now, the board only fits so much and soon it was completely covered by art projects, letter pages, and the like. There was no longer any space to write notes or lists. A bit of an inconvenience.
So, we came up with a perfect solution for the problem.
We added a picture wire!

We had a bunch of the Dignitet curtain wires already from Ikea but they, unfortunately, stick out from the wall about 2.5 inches. Our space is narrow and I was afraid that it would be out too far and get knocked out of the wall by a passerby or running kid.
So, I went in search for the same thing, but with a lower profile. I was in luck! This little beauty from Amazon only sticks out 1 1/8 inches.
The biggest complaint on the amazon site was that the instructions were a little lacking in detail. So I decided to do a quick tutorial.
Here are the instructions that come with the kit.

The first step is to install the wall anchors that come with the kit.

It doesn't specify what size bit to use, so I just started small and worked my way up. I never found the right bit, I just got close and then twisted the bit around the hole to make it slighty wider as necessary.
Next put in the long screw. Stop when you get to where the screw gets wider.
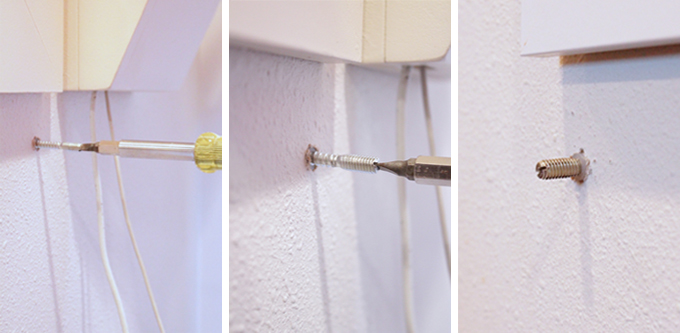
Now, you'll want to remove the tube covers off of the base.

Attach the base to the the screws in the wall.

Next, assemble the wire set-up by stringing the wire through the tube and attaching the end cap that has two screw clamps. Push the wire through the cap and tighten the screws very, very tightly, with the provided alan wrench. Cut your wire to size and repeat on the other end.
The extra piece with a single screw clamp is if you are using this wire for curtains. You would attach the clamp on both sides near the end of the wire. These clamps are meant to hold the last curtains hooks in place, so when you open and close your curtains the ends will stay put. If you are using this as a picture wire they are not needed. (This is represented in the last picture on the instructions included with the kit.)

Once you have your wire assembled, you slide the end cap inside the tube and re-attach the tube to the the base on the wall. Do this on both ends and screw the tubes onto the base until your wire is taut.

Once the line is taught add your hooks...

and your media of choice.

Pretty simple and we have certainly loved it.

The kids can move stuff around and clip stuff on. It comes with 24 clips and we have found that to be plenty.
If you feel that 24 clips is not enough for your span of wire, you can buy more from Amazon here or Ikea here (however they will not be an exact match).
For more information about our command center see this post for the full reveal, this one for the small pocket tutorial, and this one for the cost breakdown.
Tags
- Facebook Like
- Google Plus One

- Log in to post comments


Comments
We are just installing this, and I thought I'd contribute that the drill bit that worked for us was 9/32". Thanks for the instructions!