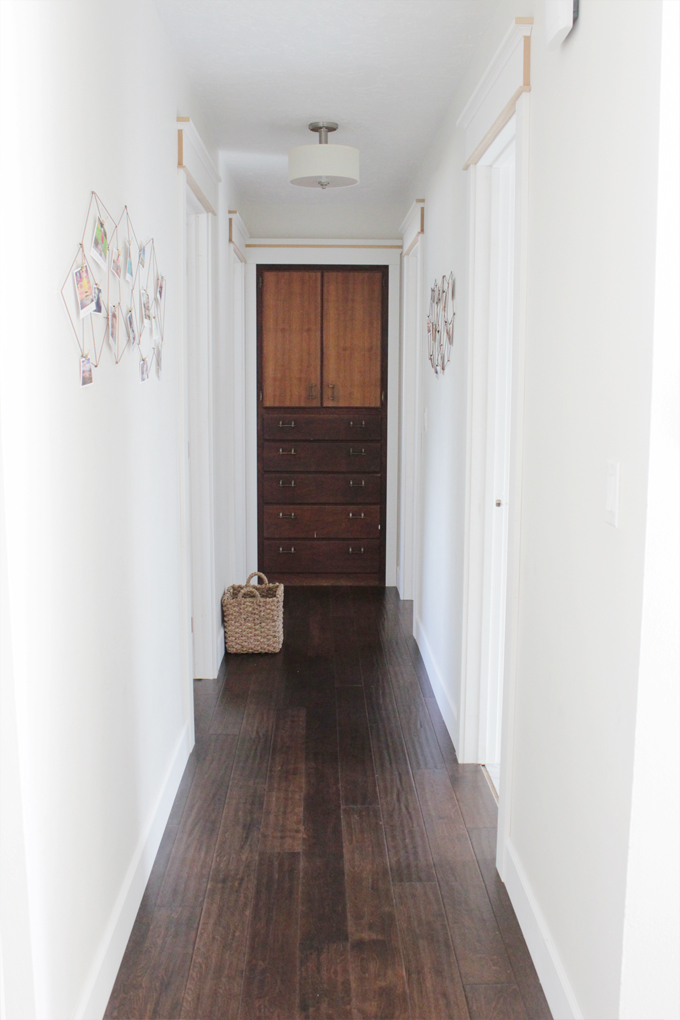
I've been thinking a long time about how I wanted to decorate the walls of our hallway. And by a long time, I mean like since we remodeled over a year ago.
Sometimes I'd think it would be better to leave it bare, then I'd think we needed another picture gallery. I constantly went back and forth.
Then, I started thinking about a way to maybe showcase our Instagram pictures *ding* lightbulb. An idea hatched and I was off to create a sketch.
I have been loving all of the geometric design lately so I wanted to make something for my wall to hang pictures on that had that look. I came up with a few sketches and went about implementing how I wanted to put them on my wall.
Attempt one didn't go so well...attempt two didn't go any better.
So, I decided to go straight to the wall.
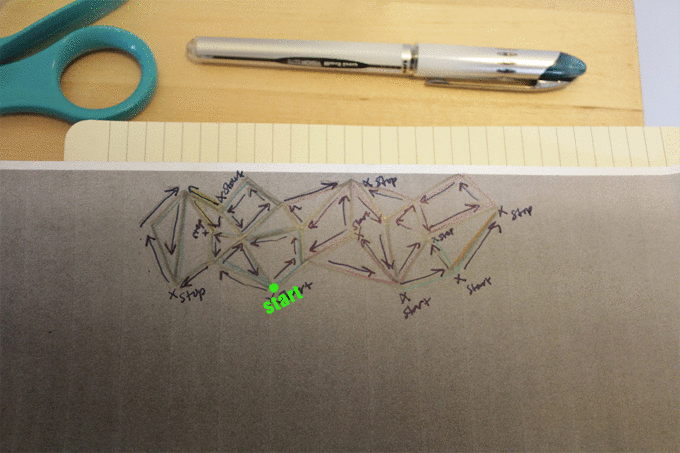
The first thing I did was put my sketch on the wall. Next, I put in a nail everywhere there is a turn or cross section. Then, I erased my lines and painted the nails to match the wall. (Sorry the pictures aren't very visible.)
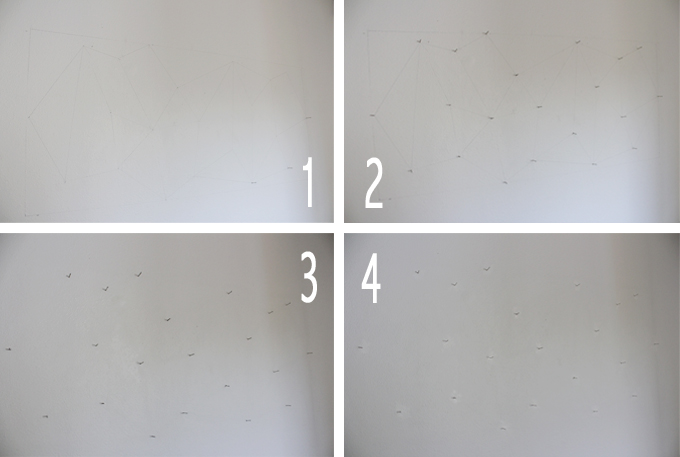
After that I made a direction chart on my sketch. I didn't want any double lines and as few starts and stops as possible. It was a bit of a puzzle but I actually enjoyed working it out.

Once I had my directions down I went to the wall.
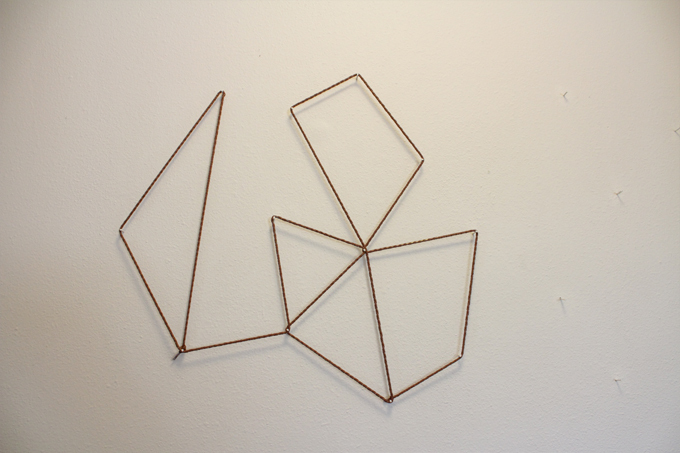
I didn't want to do the this in string or yarn since I wanted it to look more like wire. I found some bronze colored stretchy jewelry cord that was perfect, and ended up also buying some braided rope for a second photo holder.
I followed my directions and put up each section.
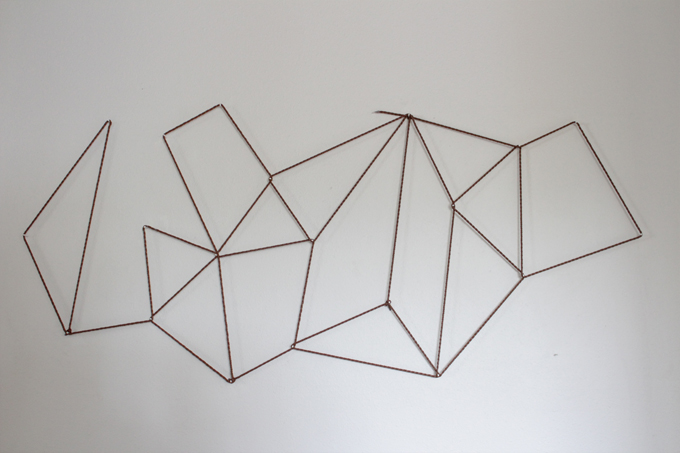
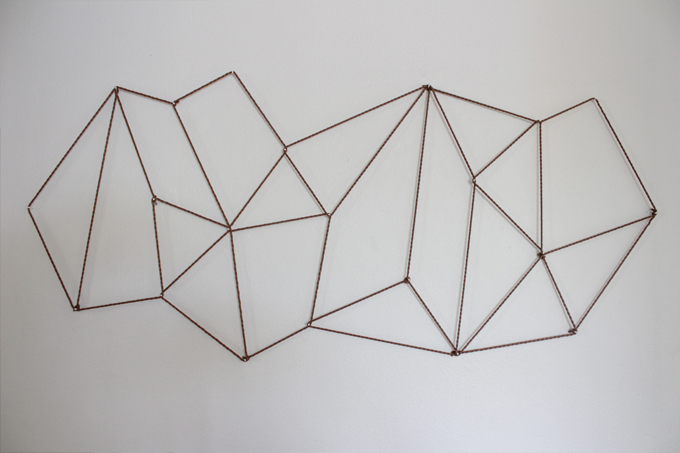
And viola!
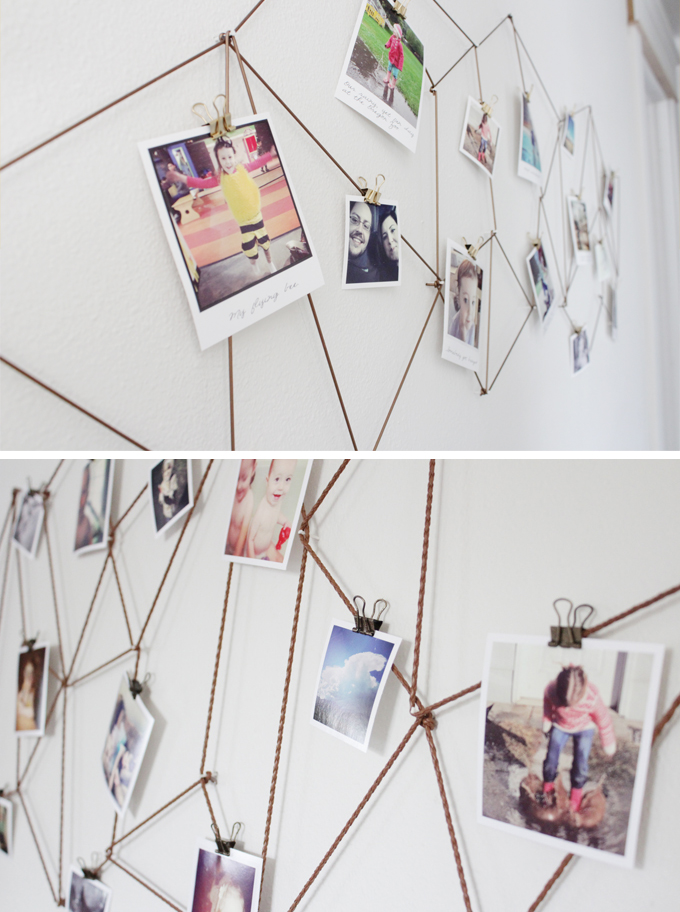
I wanted to add all of our Instagram pictures that we loved, however we had a split between my husband and I on whether we should have captions on our photos or not. So, we decided that on one we'd go with captions, and on the other without.
And this is how they turned out! This is the braided rope.
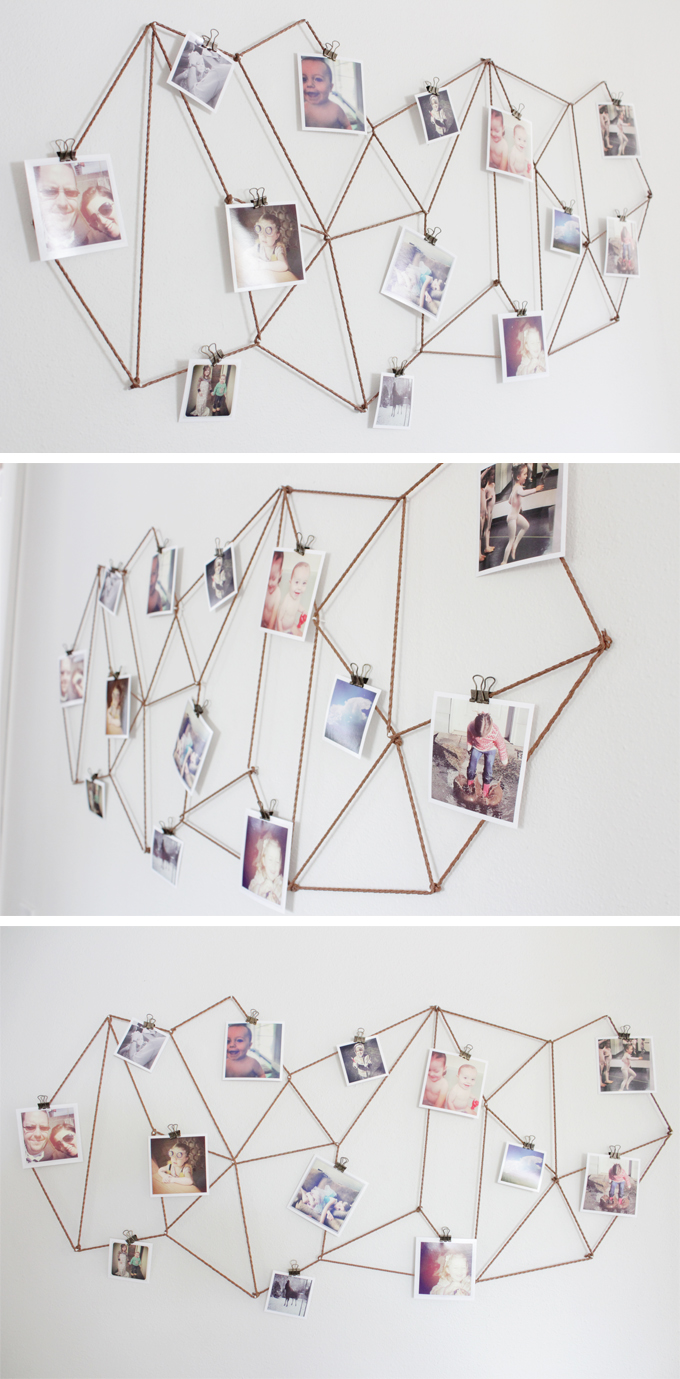
We printed our pictures at home and made them into 2x2 inch and 3x3 inch.
This is the bronze jewelry cord. The pictures with captions got an extra space at the bottom and we only did that on the 3x3's.
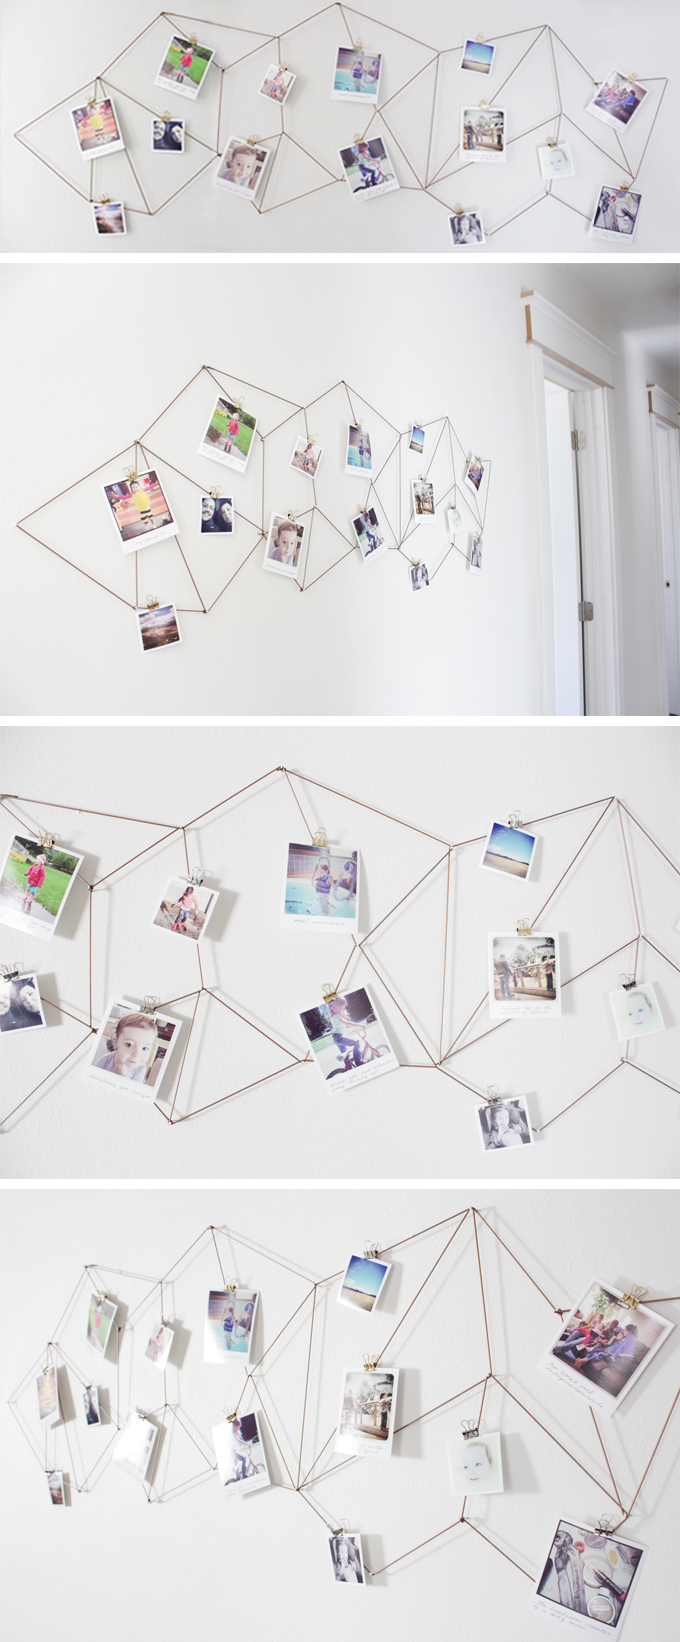
I used little binder clips to attach my pictures. On the jewelry cord they are painted gold and on the rope they are painted bronze with a dusting of gold.
There was an initial concern about the nails sticking out too far and getting caught on them, but they are very low profile. The nails only stick out a half inch and we haven't had any issues so far.
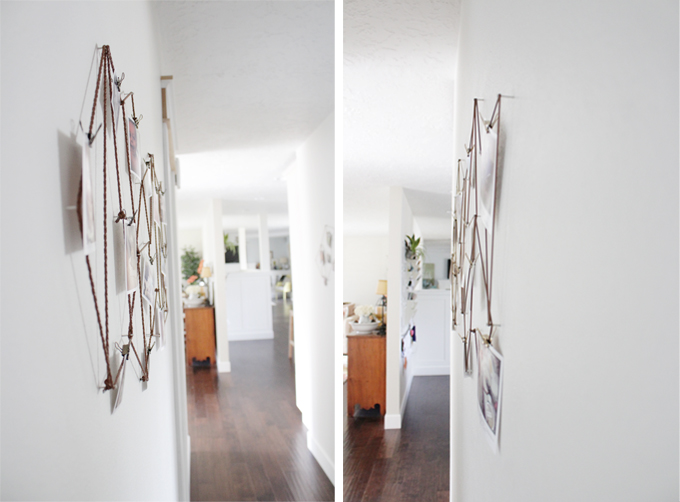
The hallway still has some work needing to be done like finishing trim, painting the black hole at the end of the tunnel, and adding some wainscoting, but the photo displays add a lot of interest and I love walking by and looking at all of our fun pictures.
And just as an FYI, the measurments for these are 4'x16" and 3'x16".
This project is also entered into the "Creating with the Stars" contest! Go click on #253 and give it a boost.
Linked With:
Update: I've had some questions concerning the actual process of how I put up my display. So, I made a gif that will hopefully show better the pattern of how each section went up and where I started and stopped each time.
Tags
- Facebook Like
- Google Plus One

- Log in to post comments


Comments
Found this via EC2. SO in love with this!! Definitely going to have to do one!!
I am DYING at how amazing this is! I'm totally going to do this in our new house!! Sharing on our FB page!! Love ya girlie!
Whoa. That's cool.
I LOVE this project! I think the geometric shape you came up with is awesome!! So glad you linked this up for CWTS!!! Glad I found your blog! -Monica
Thanks so much Monica! I'm so excited for this year's competition. It was really fun following along and voting last year and I'm looking forward to seeing all the amazing projects this year. Thanks for putting it on!
Absolutely, amazzzzingly, perfect!!!!!
I love this! You did such a great job. Sketching it out and planning how to wrap the cord to avoid doubling it was so, so smart. If you have a second, I would love if you came by and linked up at The Makers: http://persialou.blogspot.com/2014/03/the-makers-no-8.html (Good luck with Crafting with the Stars!)
Wow, I'm so happy you stopped by to link up at The Makers because this is sooooooo amazing! LOVE it!
So cool--pinned!
This is one of the best projects I've seen in awhile! Awesome job and thanks for sharing at The Makers!
Fantastic!
Question for you...how do you print the photos with the white border for writing at the bottom? Sorry if that's a bit of a dumb question!!!
Thanks
Hi Libby! Thanks for visiting! Not a dumb question at all. When I printed my pictures I just made sure to leave extra space between each one, so when I cut them out I could cut it with the extra space on the bottom. The text on the pictures I added in photoshop but they could just as easily be hand written after your pictures are printed (I just have terrible handwriting!). I hope that helps!
Thanks!
Amazıng!
I love this!!
Ahhhh it looks so pretty, I'm so glad you weathered the failed attempts!!
Oh my word I love this so much! SO AWESOME!!! I pinned it the BHG board I am on :)
Loving this!! Pinning and sharing now!!
xo sarah
I love this project Valerie! It's such a fun decorating idea for a wall to hang pictures! I love your blog as well! I already feel like we have so much in common as we share the same last name and I have 2 little girls too around the same age! Consider me a new follower :) P.S. I'm picking this project to feature on Link'n Blog Linky party this week!
www.stripesandpolkadotsblog.com
Thanks Hanna! We do have a lot in common! Your blog is great and I love that there are two sides to it. Thank you for the feature, I appreciate that! Also consider me a new follower!
Amazing dear i really empress how you all do these
You've been featured on Link'n Blogs! Come see your feature and link up again. :)
http://iputabirdonit.blogspot.com/2014/04/linkn-blogs-20.html
xo
Daniela
Put A Bird On It
This is really really cool. I've been wanting to do something with our pictures and I love how simple but unique this is.
This is so awesome! My daughter wants to make a heart shaped collage for her wall - we might have to try something similiar to this in a heart shape... it looks fantastic!
I THINK I WILL TRY THIS WITH WIRE SO THE SHAPE WILL STAY AND I WON'T USE SO MANY NAILS.
Awesome project! LOVE it!! =D
Want to try this myself in my new apartment but can't quite figure out the diagram of where to start and how to tie off and such... Could you elaborate please? (:
I would love some help with figuring this out too. I have all the materials but I'm not confident in getting started.
More details would be very much appreciated :)
I've updated the post with a gif at the bottom to hopefully help everyone understand the process of how I put up my display. I hope that helps! Please feel free to ask any other questions you might have! Thanks!!
I love this! But where did you buy the jewellry cord?
Hi Camilla! The jewelry cord and braided cord were both purchased from Hobby Lobby. The jewelry cord also comes in a few other fun colors too.
i just saw this featured on the makers, and had to come check it out. this is awesome. it's the right amount of interest without being too much. i'm a sucker for anything geometric, too.
enjoy,
b
WOW! What a clever idea! I love it, and know for sure that my 14 year old granddaughter would too, now the question is ..................... do I show it to her? Why? Because if she loves it, and wants to do it herself, I'm afraid her parents might not be too keen on all those holes in her wall. Hmmmm!! To be, or not to be??
Judi in the UK
great idea!! Could I use push pins instead of nails?
Hi Mae! I'm not sure if push pins will be strong enough to hold the line really taught, but it's worth a try! Miine are wrapped pretty tightly around the nails since I didn't want any slack in the line.
I love this, you're so clever!!!
Approximately how much rope did you need?
Hmm, if I remember correctly, I bought two of each kind of rope/cord and that was enough. The bronze cord is much more stretchy than the rope so it goes a little further.
This is great :) I want to do something similar in my entry way. My husband and I just printed 100 pictures of our family and we're trying to think of a clever way of assembling them on the wall!
How many feet/yards of jewelry cord did you need?
I bought two packages of the stretchy jewelry cord (each 3 yards) and ended up only using one. So if you were planning on just one similiar sized display 3 yards should cover it!
Hi!!!!! More than a year since your genius post?? I wish you could answer my question :) Can I paint the nails first before hammering them in?
I suppose you could paint them first...however, the actual nailing them in would most likely mar up the paint you just applied. Food for thought :)
can i use something that can replace the nails?
Someone else mentioned trying to use push pins. It's worth a shot. The only concern was that they may not be strong enough to hold the line really tight. Good luck!!
Hi i was just wondering when u are supposed to stop hoe do u tie the string so it doesn't untie
I tied each end in a simple square not. It's held up so far!
hello! ı love this! do you think twine would be strong enough to hold them? was your rope and cord very strong?
thank you!
I don't see why twine wouldn't work, so long as it's a good quality twine (I've found that cheap twine sometimes breaks easily and wears out very fast). The rope and cord I used are still going strong and I haven't had a single issue with them yet!
What size/thickness are the chord / wire you have used? It looks great!
I'd say it's only about an 1/8" thick or less.
such a lovely idea of filling the walls
Pages