No, we haven't totally forgotten about our bathroom, however, the project has been completely neglected.
Last I left you with a disaster of a story about our bathub meltdown after the inspiring "To Spray or Not to Spray" post.
Now, I want to talk a little bit about the second time around refinishing our tub.
The second product we used was the Rustoleum Tub and Tile Refinishing Kit in white.
The instructions on the box are great and very easy to follow. There are a few things you'll need that are detailed in the instructions, but here's some imagery for ya.
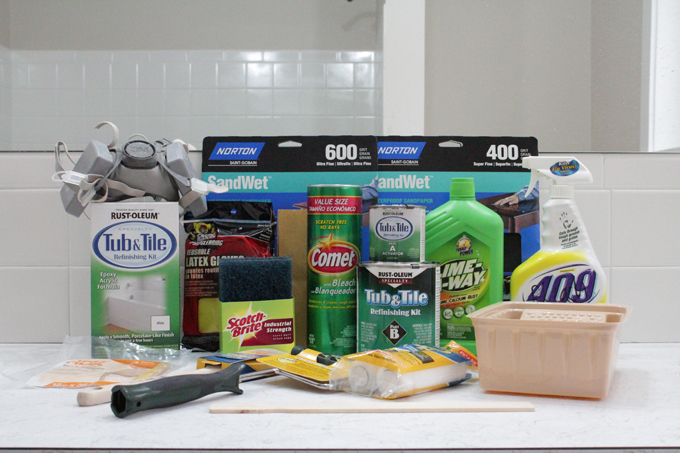
This stuff has some serious fumes so I highly recommend a heavy duty face mask.
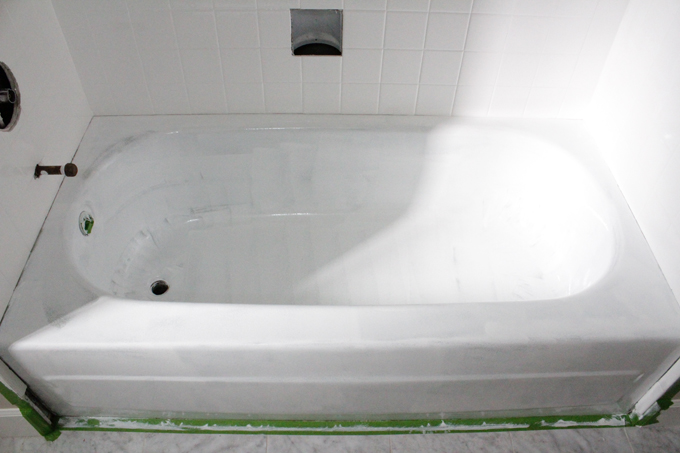
The prep work is pretty tedious and labor intensive, so prepare to do quite a few steps. It includes a lot of sanding and cleaning, and sanding and cleaning some more.
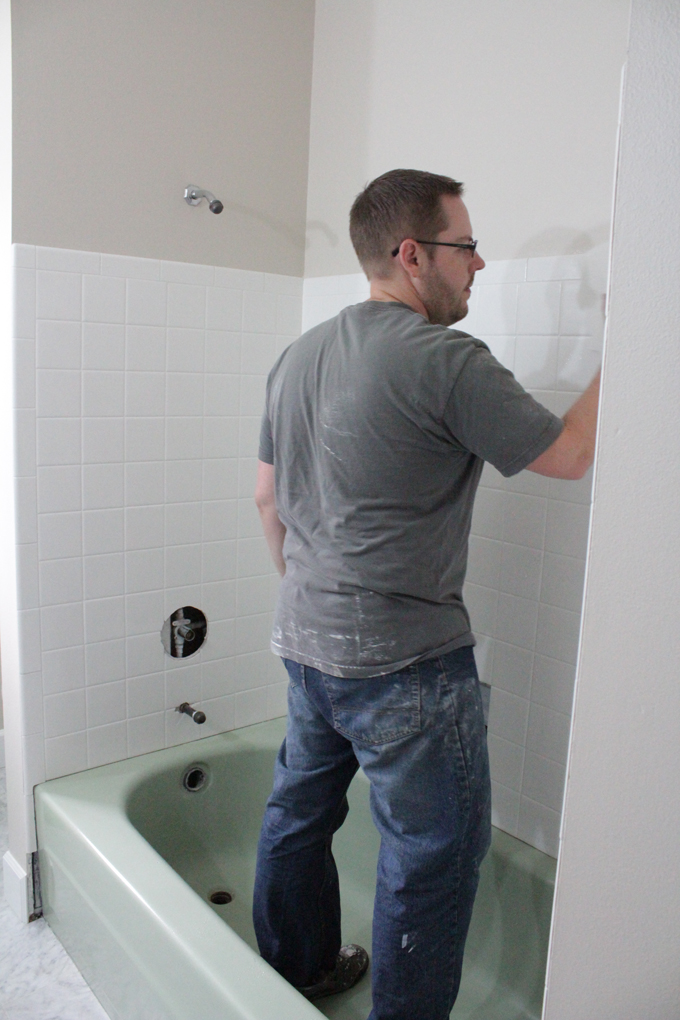
This is what our tub looked like prepped and ready to go.
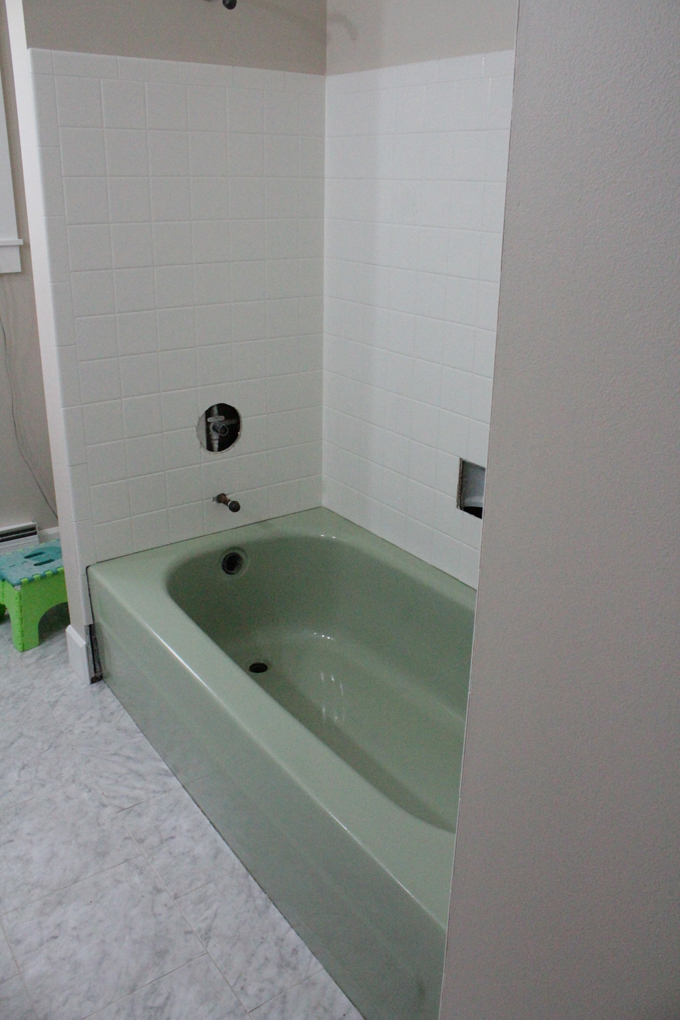
All that sanding actually made it shinier than before. We decided not to strip the original coat of finish that we had put on the tiles. We felt like the adhesion was good enough that we would just be able to coat over it with the new stuff, which ended up working out fine.
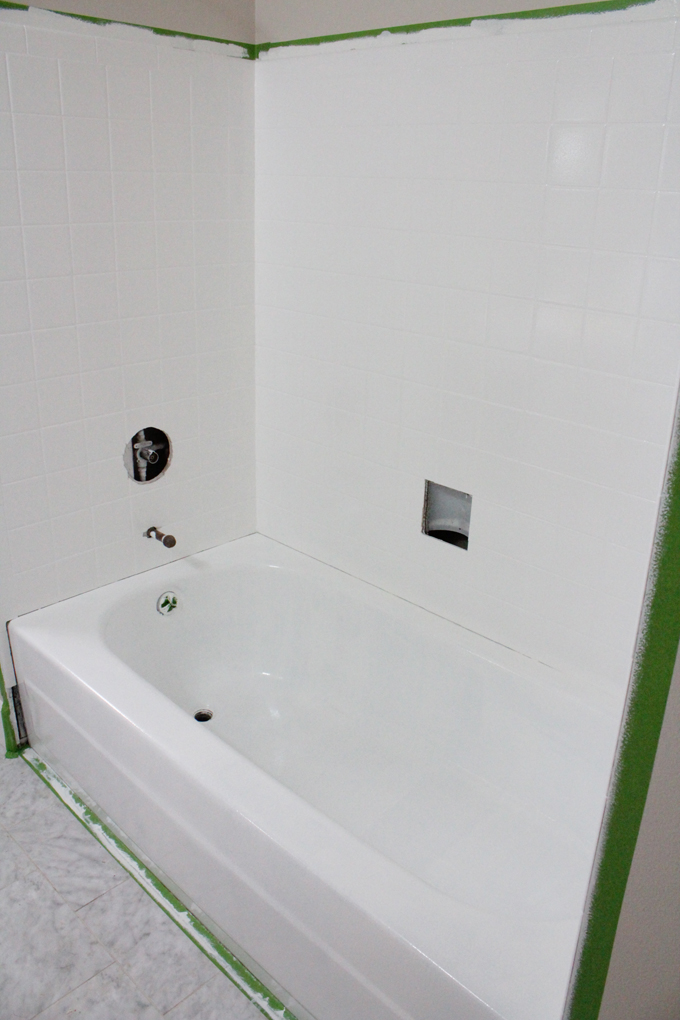
This is after one coat...
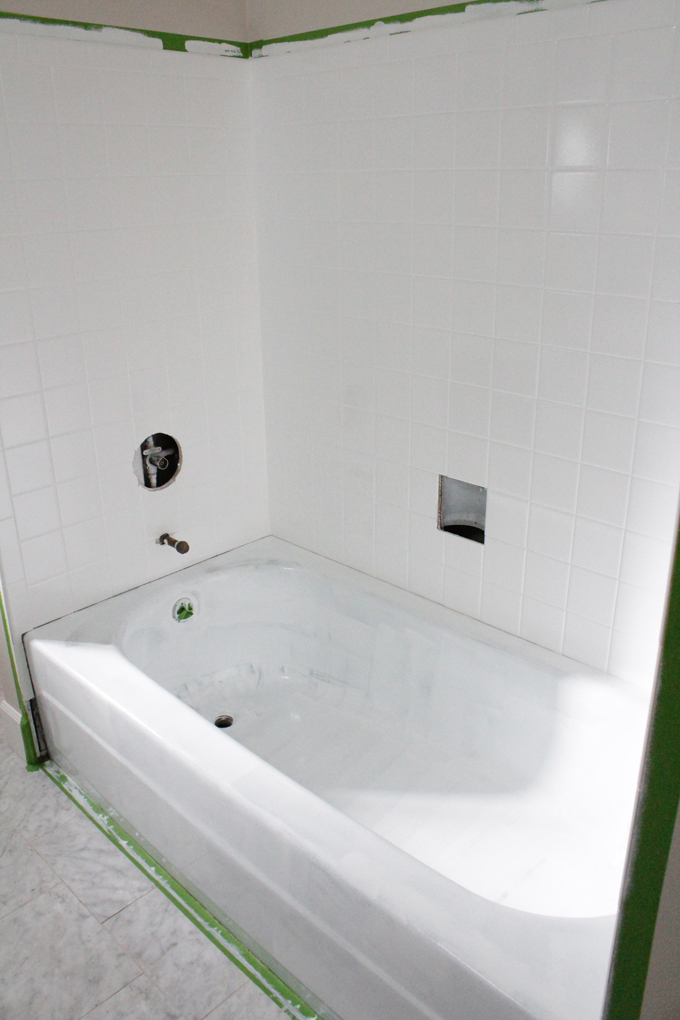
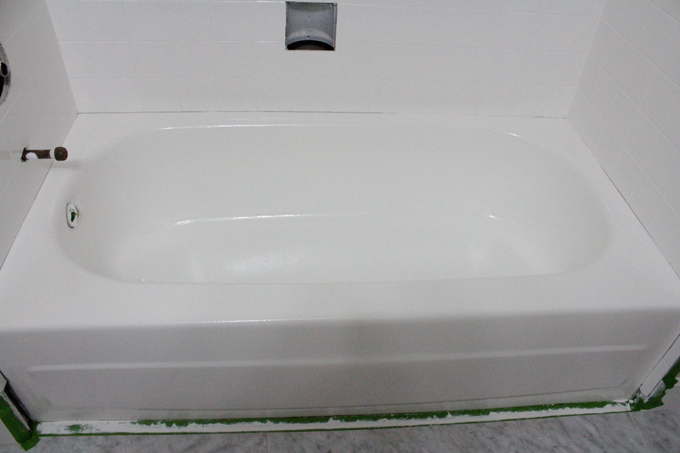
and after the final coat (which ended up taking me 4-5 coats in some places)...
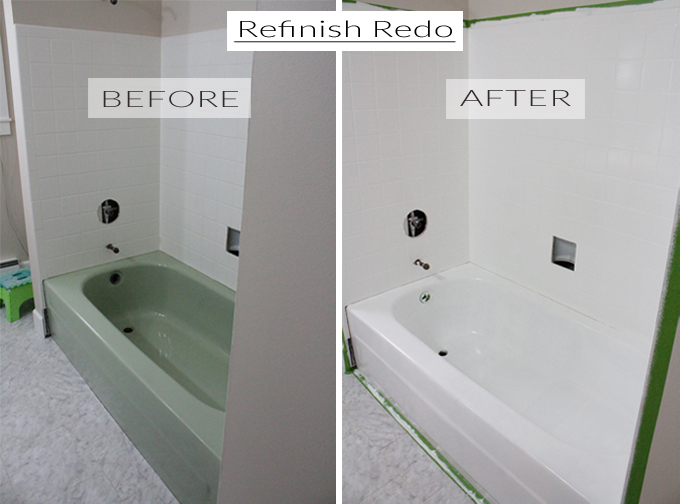
and the second before and after.
Okay, so pro's and con's of this kit compared to the first kit.
Pro's
The color of this finish compared to the first is MUCH whiter. The first is almost almond next to this white. You can see the difference with the tile in the before and after picture.
Way less prep work and mess, since this is a paint on instead of a spray on.
The final result seems much glossier and looks more bathtub like.
We have not had a single chip so far.
Con's
The finish isn't quite as smooth as the spray on.
All in all, I like this product better than the first one we used. However, there are a few things I would do differently if I did it again.
First, I would have used a brush instead of a foam roller. The roller seemed to leave a little more of a texture than a brush would have.
Second, be incredibly careful about the debris floating in the air. Unfortunately, we trapped quite a few cat/dog hairs in the finish.
And lastly, I wouldn't be so impatient. On some of the coats I didn't let it dry all the way before applying the next coat because I was so ready for this bathtub fiasco to be over. That caused the finish to be not as glossy and smooth in some areas.
So, what is my final verdict on DIY bathtub refinishing? Honestly, if you have the money to have the tub professionally sprayed, I would do it. You are absolutely going to get a better end result that will probably last longer than anything you could DIY.
However, the price difference is pretty large. If you are doing this as a temporary hold for a year or maybe three then it's probably worth it to do yourself, but if it's for an actual remodel I would pony up and have a pro do it, or replace the whole darn thing.
Tags
- Facebook Like
- Google Plus One

- Log in to post comments


Comments
We have a tub almost the exact same color green and have just started a bathroom remodel too. My intention is to just leave it green for now and then maybe replace it later; but I have considered painting it too. This was very helpful! Thanks for sharing :)
http://craftivitydesigns.blogspot.com/2014/02/bathroom-renovation-plan.html
Just used the Rustoleum product on my almond tub to fix chips from my dogs nails bought it in almond of course and it was bright mint green! Contacted Rustoleum about it and of course they wouldn't do anything about it I wouldn't recommend this product to my worst enemy.
We are remodeling our bathroom and have a green tub. So thanks for the info. i will probably just replace the tub.
You can sand down the rough areas with 2,000 grit then polish with 3m rubbing compound on electric grinder.
I'm planning a bathroom upgrade and considered replacing a very solid fiberglass shower, but then thought, "It's a great shower. I'll just refinish it instead." After reading your experience, I'm now looking at removing it and installing a new shower. Thanks for taking the time to provide all of the detail. Very helpful;)
I just finished the 2nd coat and end of the first box of the rust oleum tub and tile paint and rolled it on my green tub.. It looks terrible. Never again. Truly wish I seen this prior to painting my tub and almost dying from the fumes even with a respirator mask. Never again.
And might I add.. Never again.
Very helpful and very enjoyable reading...still don't know what is best to do though other than pull everything out...but oh the cost.!
I have been shopping products and reading reviews and instructions on various brands and techniques. I just came to your blog, and want to thank you from the bottom of my heart-up for taking the time to write and post pictures concerning your experience. This has made all the difference in the world to my decisions. Thank you!!!
Boy, those green tubs were quite the thing...in the 70s & 80s ...yes, we have one too! Haven't decided which way to go, but like the others, I add my praise to you for your excellent photos and details. If that last product lasts a few years we may go that way, as we have priced the professional job. I'm not keen about breaking up and hauling out a tub which has NO problems except its color! So a decision must be made! Think green will come back?? ha! ha!
Been trying to do my research online, and I see a lot of refinishing, but I am really curious on the durablity of the product. Has it lasted as well as you had hoped? I am looking at doing this treatment to a cast iron sink I have, but I want to make sure that it will last longer than a year before I do :)
Thank you so much for sharing your experiences is such a useful way. My recently acquired claw-foot bath needs some love and you've given me a bit to think about. Thank you.
I on the other hand, chose to hire the one and only "professional refinisher" here in Grants Pass, Oregon to refinish my tile shower. He sent us to a customer he did work for and the preview of his work was great. However after he did refinish our Tile Shower, it was sprayed with his special spray gun and when I got home from work with the expectation of a newly refinished shower, I was terribly disappointed. The floor of the shower apparently was not prepped correctly and now has a crackly finish where the paint appears to have shrunk and cracked. There are serious paint runs on each of the inside walls. It's pitiful ! The contractor told us because we were so unhappy with the work he was going to retire from this business and so wouldn't charge us for his effort. After pleading with him, he did come back once and sanded about half the runs out but left saying he would return another day to finish the repairs but now he will not return our many calls. Not only did I NOT get a professional job but I got a professional jilting. The cost to remove his mess will probably be more costly than his original bid. And then still have to decide whether to remove the old tile and retile or try to paint this epoxy paint finish myself. Thank you for your advice and tips on how to get a better job than I got my first time around. My point is you probably will get just as good a job doing the work yourself as you possible would spending the big bucks for a "professional" to do it for you.
I have a white tub, wonder if it would cover better and with less paint??? My tub has been already repainted (the pro tub stuff) is curling off and probably I would need to take it all off (exhausted already) but maybe I only paint certain sections (I rent, landlord will not do anything - he did the first repaint while the tile was totally torn out - but didn't replace the tub)
How does it look now? This post looks about 2 years ago, curious how it held ip
Hi Chris!
As I expected, the bathtub started to chip not long after we painted it. Over time the chipping just continued to get worse until 1/2 of the paint on the bathtub floor had come off. The bathtub has since been replaced. I definitely stick to my opinion in the post that if you want to spray your tub either find a reputable proffesional to do it or replace the whole thing.
How did your tile hold up? I did only my tile with homax and hate it. I'm trying to decide what to do next. Did you do any other prep work for your tile before using the rustoleum on it? Any tips would be great!
Hi Erica!
The tile did hold up a bit better than the tub. But eventually, over time, the tile began to chip as well. We did all the prep work that was recommended on the box to a T. I guess my best tip would be to save the time and money and wait until you can just replace it. Maybe others have had a good experience with it but for us it was not worth the time,effort, or money we put into it. Hope that helps!
I also want to leave a big 'Thank You'. I've been Googling like crazy trying to find some reliable (not fake) reviews comparing Homax & Rustoleum. I did notice a comment under someone's video saying he used he Homax product daily and he's ok with it, but emphasized * the spray-on product is CRAP!* I'm fairly certain it was the Homax paint on I used back in '07 on a 50+ yr old cast iron tub and surrounding tile. It worked fairly well, BUT, it was only me using the tub/shower. It held up for about 5 years before I started seeing any chipping off. The only issue I had was in not cleaning well enough after the steel wool (as per instructions) and I soon saw tiny rust specks bleeding though.
NOW .. I'm about to do a big, 25 yr old, (pink & gray) cultured marble garden tub. I literally just grabbed a box of paint-on Homax while I was shopping for another project. It wasn't until after that, I decided to keep and do the sink too. After reading your blog post, I think I'm going to return the Homax (Lowe's) and get 2 kits of Rustoleum (Home Depot?). But first I'm going to explore possibly obtaining yet a different product used my the professional refinishers (an idea triggered from my Googling).
I think most the challenges I see people posting about in general on this process is that 1) people (not you) are maybe not skilled painters to begin with and more importantly go into this project thinking of it as "a paint job" and not being in tune w/ the concept they're working with EPOXY .. it might be applied with a brush like latex paint, but it is a very different beast.
I am a internet troller and rarely leave comments, but I really do appreciate the effort you put into publishing this. Hat's off to you! You're not alone, I am a DIY renovation junkie and I can't tell you how many seemingly 'easy' 2-day projects I've ended up going to Hell and back multiple times for weeks on. Like the recent quarry clay tile walkway I refurbished. I don't even want to talk about it, I'm still traumatized. LOL!
Follow-up to my earlier comments^... I was just in my bathroom and saw the Homax box siting there and noticed is says "New and improved", hmmm.
Also, haven't dug deep yet, but in the meantime if this helps anyone, I stumbled on this and will be looking into it further. From what I glanced at, the standard product is about $50. It is some type of resin ('professional product'?) instead of epoxy.... there isn't a way to 'follow' blog comments here as far as I can tell so, if anyone knows anything about this product or posts here, please email me @ KayzGazebo@aol.com. thanks!
http://www.bath-works.net/Bathworks-Bathtub-Refinishing-Paint-Is-Superio...
I want to try the Rustoleum product on my white tub as a temporary fix. It's not that bad; just old and not shiny. One thing is not made clear on the box or in your blog--when you sand with the wet/dry sandpaper, is it wet or dry?
Hats off to the Caldwell clan for your entertaining advice. Cured my post application depression. I too used the Homax spray and followed the prep and application directions to a tee. Left it undisturbed for 5 days @ 72 degrees and 35% humidity. I can actually scrape it off with my FINGERNAIL!!! From the sound of subsequent posts, seems the Rust-oleum didn't fare much better for you guys. I'm calling a company called Bath Fitter here in CT for a tub insert and be done with all this!!!
That was hilarious! You should be a comedian! We have an old claw foot bath and my partner still wants to do it! Oh well if it goes wrong it can be a plant holder in the garden
Thank you so much! Think I'm gonna leave mine for now!